Scripts
Script components allow you to run small JavaScripts to make your prototypes even more interactive. You can for example use them to set data binding values, load or send data to a server, or calculate dynamic values, like the sum of two input fields.Scripts are currently in the beta phase. You need to enable them in the settings menu. Click on the menu ( ) , select "Settings" and tick the "Enable Beta Features" checkbox.
Introduction
Select the icon in the right toolbar and drop the widget on the canvas. When you select the script widget, you can see in the right menu an "Edit Script" button. Clicking it will open the Script editor. The editor has on the right side, the simulator and on the left a simple JavaScript editor. You can enter your scripts there. Click on "Run" to execute and test the script. In the "Console" tab, you can see the output of the script.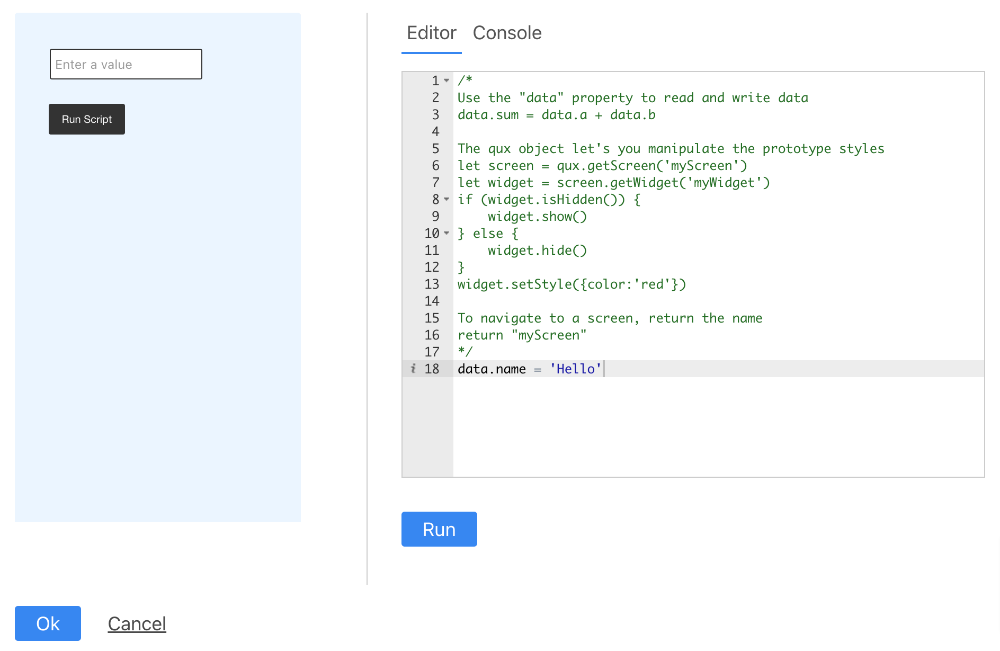
Basics
The script has access to Quant-UX objects, the "data" binding and the "qux" object.- The data object allows you to read and write data through the data binding that is defined for the components in your prototype.
- The qux object allows you to change the styles for the components or to change the visibility.
- The event object shows from which widget the script was triggered.
- If the user clicks on a component and the component is wired to a script. Use this to trigger the actions only on explicit user interactions.
- On data-binding changes. For instance, the user changes the value of a text field. Use this to update other components are set dynamic data-binding values.
- When the simulator is loaded. Use this to prefetch data, or set data.
Reading & Writing data
To access data, you need to use the data-binding mechanism. Suppose you want to calculate the sum of two text fields. You need to- Create two text fields and a label to show the sum.
- Select the first text field and set the data binding to "valueA"
- Select the second text field and set the data binding to "valueB"
- Select the label and set the data binding to "sum"
- Add a script component to the canvas
- Add a button and wire it to the script. When the user clicks on the button the script is executed.
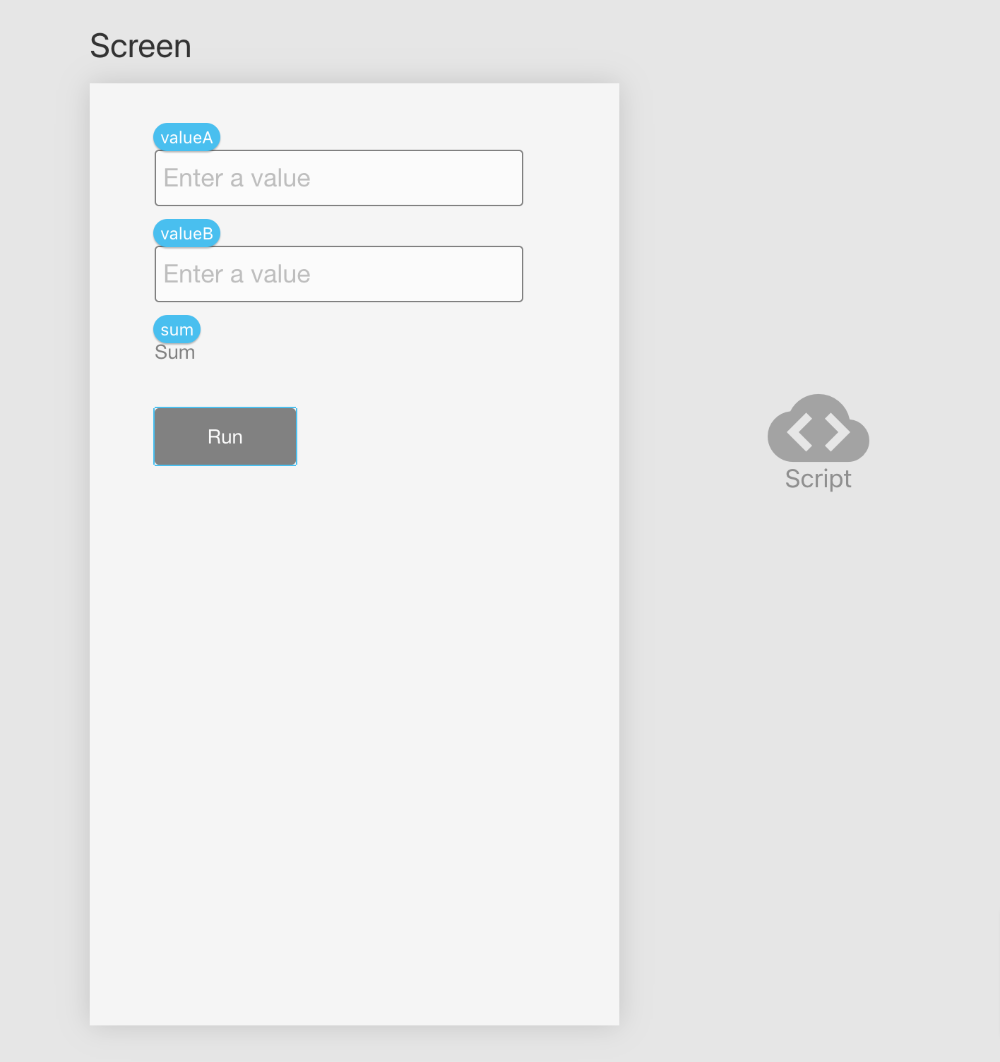
Now open the script editor and enter the following script. "
data.sum = data.valueA * 1 + data.valueB * 1The script will read the user input from the first text field, which is saved in "data.valueA" and add the value of the second field ("data.valueB"). The result is written to "data.sum" and thus shown in the label.
Text fields return string values. You need to cast them to numbers, e.g. by multiplying with 1.
Programmatic Navigation
To navigate after the execution of a script to a specific screen just return the name of the screen. You can also use it with the data binding to build conditional navigation. The following example will show "Screen A" if 'a' is entered into a text box, and otherwise "Screen B"if (data.valueA === 'a') {
return 'Screen A'
} else {
return 'Screen B
}
Automatic calculations
You can also run the script automatically, every time the data has changed. Also, you want to initialize some values when the prototype is tested. Perform the following steps:- Create a "Grid" elements, which can repeat the child elements.
- Add a single text field to the grid.
- Create a label and set the text to "Sum: {0}". The {0} is a placeholder and will be later replaced.
- Bind the "Grid" to a "items" data-binding.
- Bind the text field to a "value" data-binding.
- Bind the label to a "sum" data-binding.
- Add two Script components. Rename the first to "Load" and the second to "Sum"
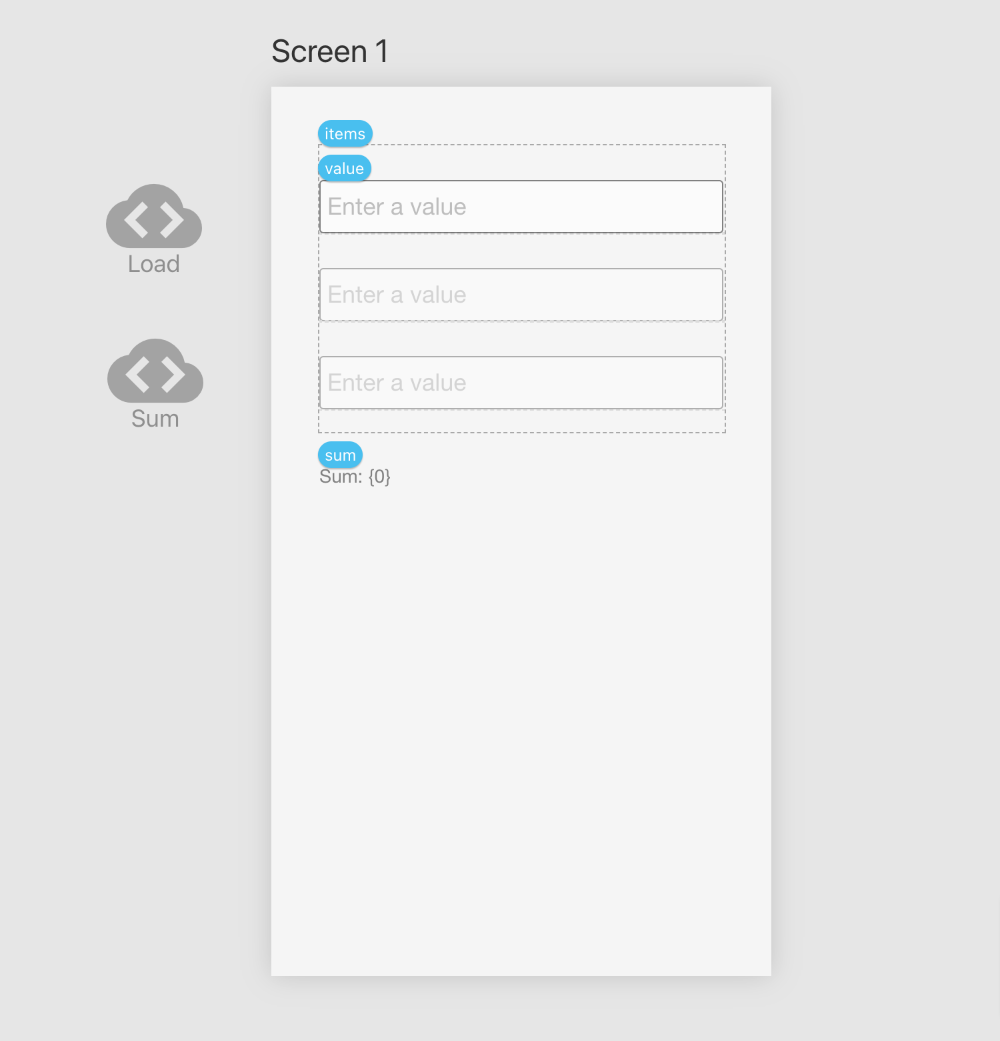
Select the "Load" script and enter the following value:
data.items = [
    {value:1},
    {value:2},
    {value:3}
]
To execute the script on load, change the trigger in the right properties panel to "Loaded Trigger". Now the script is executed when the simulator is launched. It will set the "items" variable to the list of objects. The "Grid" will now loop over the list and create a text field for each element in the list, because it is bound to "items". The text fields will be bound to the "value". So the first element is bound to "items[0].value", while the second is bound to "items[1].value" and so on. Select the "Sum" script and enter the following value:
let sum = 0
data.items.forEach(item => {
    sum += item.value * 1
})
data.sum = sum
To execute the script on any input change, select the trigger "Data Trigger" in the properties. When the user changes the value (and after the first load), the script will calculate the sum and set it to the "data" object. Toggle Visibility
To toggle the visibility of an element you need to:- Create a screen called "ToggleScreen"
- Create a button
- Create an element to toggle, e.g. a rectangle. Call it "ToggleCntr"
- Add a Script component and wire it to the button
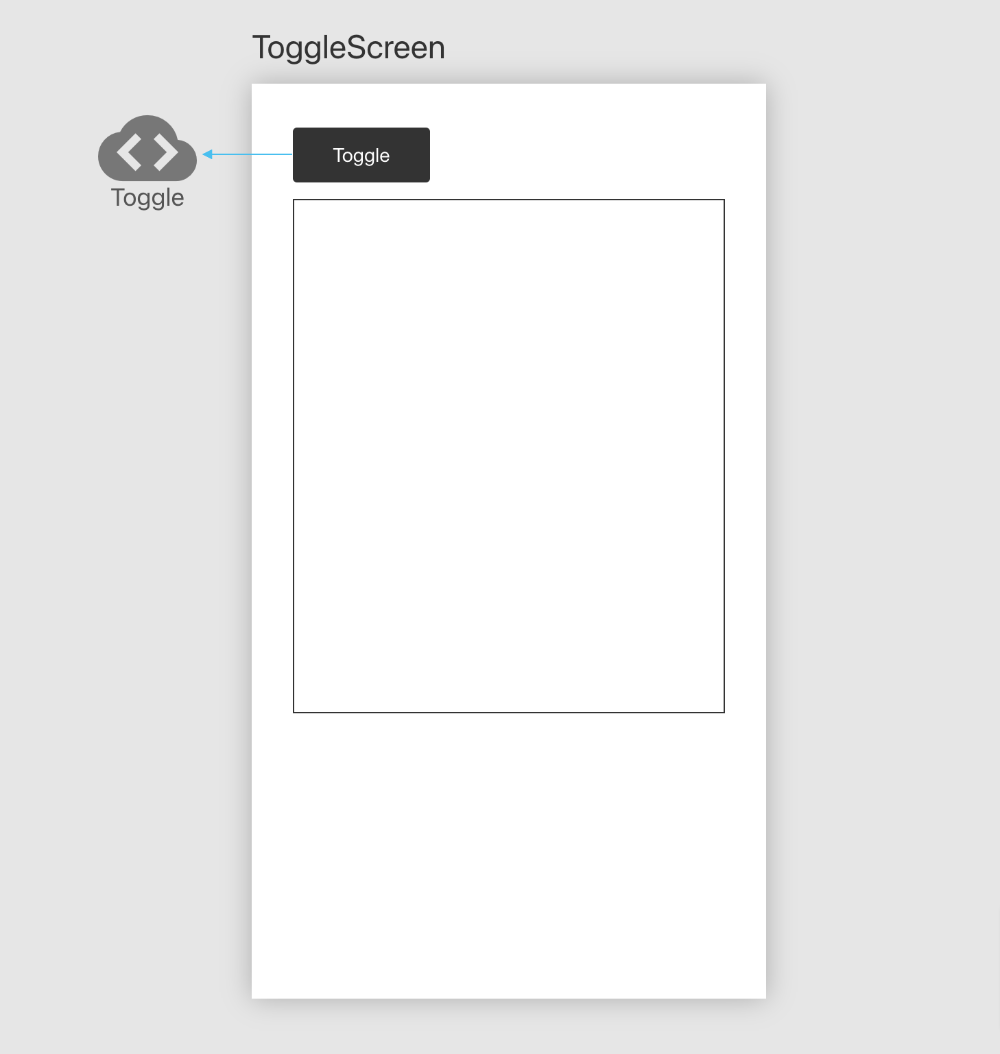
Now edit the script and add the following code:
let toggleScreen = qux.getScreen('ToggleScreen')
let widget = toggleScreen.getWidget('ToggleCntr')
widget.toggle()
The script uses the qux API object. - In the first line, it will get the screen by its name.
- In the second line, we get the "ToggleCntr"
- In the last line, we will toggle() its visibility.
You can also use the hide() and show() methods to set the visiblity depending on a value!
If you want to hide several elements, you need to group them and use the getGroup() method.let toggleScreen = qux.getScreen('ToggleScreen')
let group = toggleScreen.getGroup('ToggleGroup')
group.toggle()
Styles
You can also set the style of an object. Let's assume we want to make an element red if the value is too low. The code would look like this:let screen = qux.getScreen('Screen')
let widget = screen.getWidget('Element')
if (data.valueA * 1 < 100) {
widget.setStyle({color: 'red'})
} else {
widget.setStyle({color: 'black'})
}
The script uses the setStyle() method to set a new style. You simply need to pass a JavaScript object of key-value pairs. The keys are the CSS property you want to change, the value is the corresponding CSS value. You can also pass several properties in one call. Quant-UX follows the standard JavaScript way of set CSS styles. For instance, the "border-top-color" would have the key "borderTopColor"
Haptic Feedback
To give haptic feedback, use the vibrate() method. You can pass a number or an array of numbers to define the pattern. For more details see the Mozilla website.qux.vibrate(200)
qux.vibrate([100, 30, 100, 30, 100])
Vibrations work only on mobile devices